-1.png?height=120&name=Quartet%20logo%20(light)-1.png)
Quartet Workspaces organize related Search Projects into shared, high-level containers for easier access and collaboration. Shared notes, tags, and reports enhance consistency and efficiency across thematically linked projects.
Table of contents
Quartet Workspaces provide a way to organize and manage related Search Projects, especially useful when working across multiple cases, clients, or technology areas. A Workspace acts like a larger folder that contains individual Search Projects, grouping them together for easier access and collaboration.
Within a Workspace, you can share notes, tags and reports across all Search Projects included. This helps maintain consistency and saves time when working on thematically related searches. Notes and tags can be shared with others or kept private, depending on your preference.
Workspaces can be shared broadly across your organization or restricted to selected colleagues, making it easy to coordinate with team members while keeping control over access. This structure supports both solo work and collaborative efforts, helping you keep search work organized and accessible.
Creating and managing Workspaces
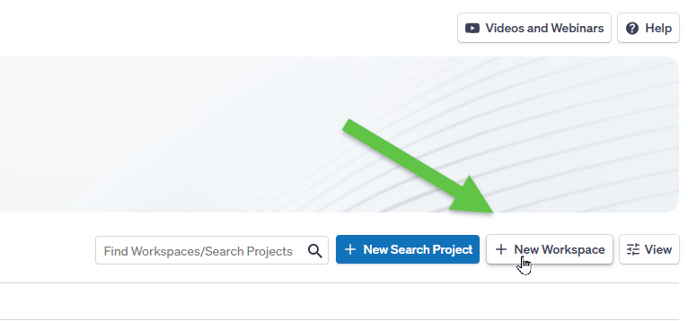
From the Quartet Home page, click on the “+ New Workspace” button towards the top right-hand corner:
Enter the Workspace name and an optional description, then set the Workspace permissions:
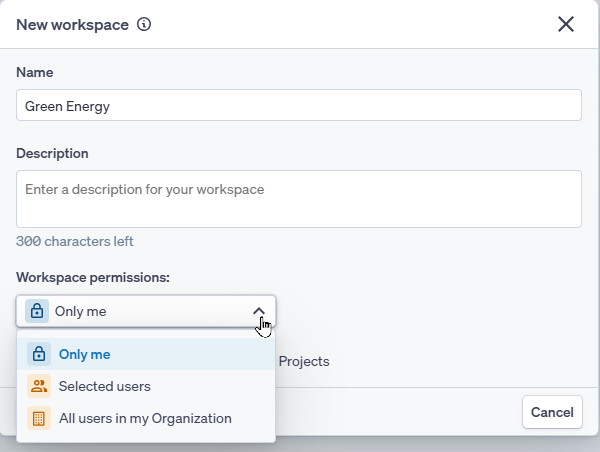
- Only me – to set the Workspace as private.
- Selected users – share the Workspace with selected users. In the lookup box find who you would like to share the Workspace with.
- All users in my Organization – share a workspace with all users. Set the default permission for all users (see table below). It is possible to add individual users with different permissions, e.g. all users should by default be viewers, however some should be editors.
Please note that Workspace permissions can be changed as needed.
When sharing with selected users or the entire organization, multiple permission rights are available:
| Role | Description |
| Owner |
Can edit workspace properties and manage permissions. Additionally, they can create Search Projects within the Workspace |
| Editor |
Can create search projects within the Workspace as well as see notes and tags added in the Search Projects within the Workspace |
| Viewer |
Can see a list of Search Projects along with their notes and tags |
|
No access |
This setting is useful if a Workspace has been shared with an entire organization, however some users should not have access to the Workspace. In this case, look up the relevant users in the search box and set the access rights as needed |
For all permission options, notes and tags are automatically shared across Search Projects within the Workspace – if selected on the Workspace. This means that if an annotated or tagged record appears in multiple Search Projects in the Workspace, the information will be available across all Search Projects. It is possible to toggle this option off and on as needed.
Please note, that when annotating records, you will also have the possibility to set access rights for individual notes.
Pro Tip: Add multiple notes in the same place with different access rights.
Click on Create Workspace to save and start adding Search Projects.
Once the Workspace has been created the very first page displayed is the Workspace management page, where it is possible to create Search Projects and control the Share settings from the right-hand side.
To access the Workspace management page for an existing Workspace, mouse over or expand the Workspace of interest, then click on Open Workspace on the right-hand side:

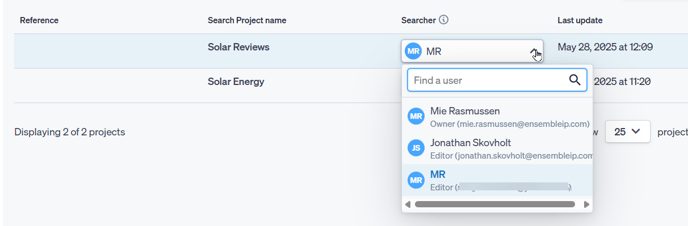
If you are the owner of a Workspace where other users have access to run searches, it is possible to change the Searcher on individual Search Projects. The Searcher is the only one who can run searches, edit Reports, add records to the Saved list and create alerts.
To do this click on Open Workspace to the right of the relevant Workspace, from the dropdown list under Searcher, make the changes as necessary, the click on Confirm within the pop-up message.
On the Home page, by default only Search Project assigned to you are visible, to view all Search Projects, click on the View button on the right at the top of the list of Workspaces, then select Projects from all users:
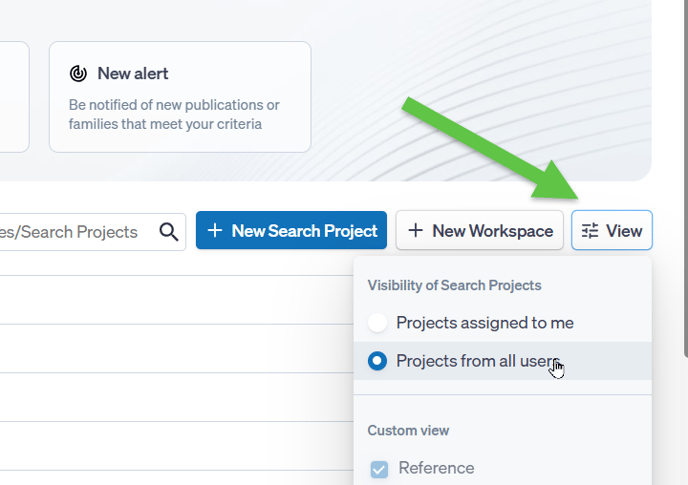
Additionally, within the menu it is possible to select what information to display for each Workspace:
- Reference
- Project name
- Description
- Searcher
- Creation date
- Last update
Deleting a Workspace
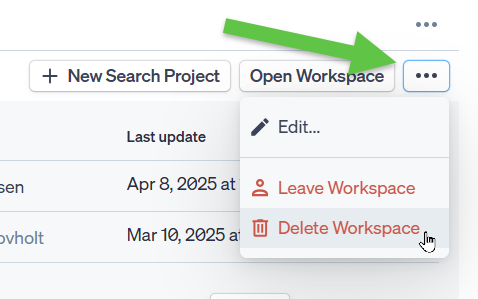
To delete a Workspace either Open the Workspace and click the Delete Workspace button in the top right-hand corner, or click on the three dots next to the relevant Workspace, then select Delete Workspace:
If the Workspace contains Search Projects, a prompt will appear where it is possible to:
- Delete all Search Projects along with the Workspace
- Move Search Projects to another Workspace
If selecting to move the Search Projects, a dropdown list will appear, which contains all the available Workspaces.
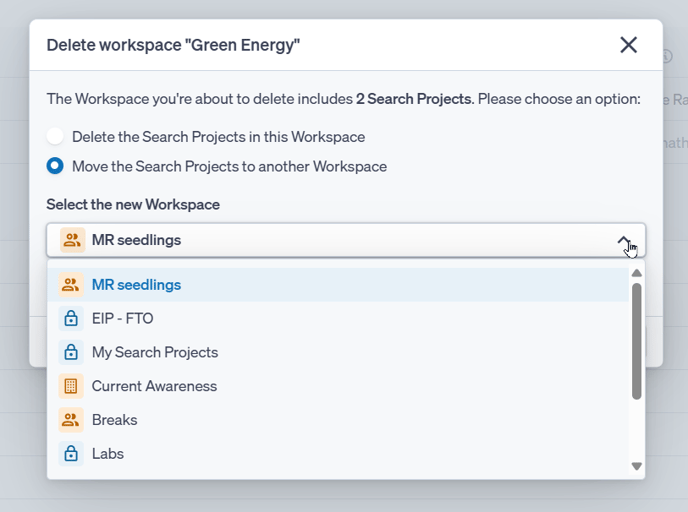
After selecting the new Workspace click on Confirm to make the changes.
Leaving a Workspace
To leave a Workspace enter the Workspace management page or select the Leave Workspace via the three dots to the right of the relevant Workspace.
There are a couple of options available, depending on the access level.
- If the owner leaves, they must choose a new owner.
- If the person leaving is the searcher on any projects, they must reassign those projects to someone else.
Once you leave, only the workspace owner can add you back to the workspace.
Reassigning a Search Project within a Workspace
Search Projects within Workspaces can be reassigned either by the Searcher or the Workspace owner.
To reassign a Search Project, click on Open Workspace, then from the Searcher dropdown menu on the relevant Search Project, select the new Searcher and click Confirm.
Please note that the original Searcher will have Viewer access to the Search Project unless removed from the Workspace.
Move Search Projects to another Workspace
Search Projects can be moved between Workspaces either by clicking on the three dots next to the relevant Workspace on the Homepage and selecting “Move to other Workspace”.
Alternatively, by opening a Workspace, then clicking on the three dots to the right of the relevant project and selecting “Move to other Workspace”:
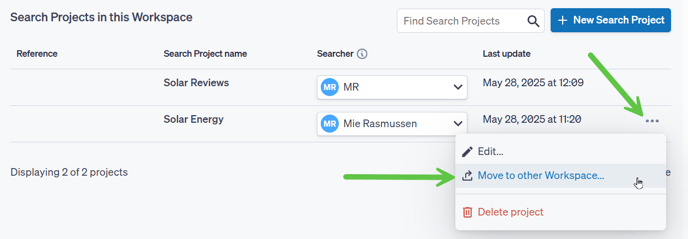
For both options, on the pop up, select the Workspace to move the Search Project to via the dropdown selection.
It is possible to keep a copy of the Tags and Notes added to the records in the original Workspace, should you wish these to appear on the records in a different Search project. If this option is selected, please choose another Search Project available within the Workspace to copy the data to.
Any notes or tags will now automatically appear on the records, should they appear in existing searches or new searches within the Search Project.
Complete the action by clicking on the Confirm button.
Permissions for Viewers when accessing a project
|
Sections and Functionalities |
|
|
Project Settings |
Viewer-Only Permissions |
|
Delete project |
❌ |
|
Edit project properties |
❌ |
|
Timeline |
|
|
Export timeline |
✅ |
|
Open a search |
✅ |
|
Control view options |
✅ |
|
Run a new search |
❌ |
|
Update timeline |
❌ |
|
Reset timeline |
❌ |
|
Individual search menu (duplicate, mark as seen/unseen, add to report, delete search) |
❌ |
|
Notes |
|
|
View and search for Shared and Public notes |
✅ |
|
Add notes |
✅ |
|
Edit own notes |
✅ |
|
Export all notes |
✅ |
|
Remove own notes |
✅ |
|
Remove notes from other users |
❌ |
|
Tags |
|
|
Create new tags |
❌ |
|
Manage tags |
❌ |
|
Add tags to notes the user wrote |
✅ |
|
Add tags to documents |
❌ |
|
Remove tags from documents |
❌ |
|
Highlights |
|
|
Open highlights |
✅ |
|
Turn highlights on/off for the current user |
✅ |
|
Add/edit/remove highlights |
✅ |
|
Results list |
|
|
Export results |
✅ |
|
Run search insights |
✅ |
|
Adjust view options |
✅ |
|
Create a command from search insights |
❌ |
|
Mark results as seen/unseen |
❌ |
|
Add to timeline |
❌ |
|
Add to report |
❌ |
|
Document page |
|
|
Export documents |
✅ |
|
|
✅ |
|
Copy public link |
✅ |
|
Report missing data |
✅ |
|
Open PDF |
✅ |
|
Add/remove documents to Saved list |
❌ |
|
Add/remove documents from reports |
❌ |
|
Reports |
|
|
View report |
✅ |
|
Copy public link of report |
✅ |
|
Export in Report - Copy all numbers |
✅ |
|
Export in Report - Export documents |
✅ |
|
Manage view options |
✅ |
|
Export in Report - Add to Timeline |
❌ |
|
Create a new report |
❌ |
|
Edit existing reports |
❌ |
|
Delete reports |
❌ |
|
Change shared status of a report |
❌ |
|
Reset a report |
❌ |
|
Change order of documents |
❌ |
|
Alerts |
|
|
View alerts |
✅ |
|
Open alert update |
✅ |
|
Create alert |
❌ |
|
Edit alert |
❌ |
|
Delete alert |
❌ |